banner


How Much To Repair Wii Broken Disc Drive Nintendo

Introduction

Use this guide to supercede a broken DVD bulldoze. Depending on your new part, you may have to bandy out the iv rubber grommets on the DVD drive housing.

  1. Use a metal spudger to remove the white plastic screw covers stuck to the lower case near the front of the Wii. Use a metal spudger to remove the white plastic screw covers stuck to the lower case near the front of the Wii.

    • Use a metal spudger to remove the white plastic screw covers stuck to the lower case near the front of the Wii.

  2. Remove the two 8.3 mm Tri-Wing screws hidden under the covers you just removed.

    • Remove the two 8.iii mm Tri-Wing screws hidden under the covers you just removed.

  3. Remove the single 5.9 mm Phillips screw under the controller port door nearest the faceplate.

    • Remove the single five.9 mm Phillips screw under the controller port door nearest the faceplate.

  4. Use a metal spudger to remove the rubber foot stuck to the side of the Wii near the DVD drive opening.

    • Use a metal spudger to remove the rubber foot stuck to the side of the Wii near the DVD drive opening.

  5. Remove the single 5.9 mm Phillips screw hidden under the foot you just removed.

    • Remove the unmarried five.9 mm Phillips screw hidden under the foot you just removed.

  6. Carefully pull the faceplate away from the front of the Wii. Use a pair of tweezers to disconnect the LED cable's plastic connector from the motherboard.

    • Carefully pull the faceplate away from the front of the Wii.

    • Use a pair of tweezers to disconnect the LED cablevision'due south plastic connector from the motherboard.

    • Remove the faceplate.

  7. Open the controller port cover until it is perpendicular to the black controller port bezel. Pull the controller port cover straight up to release it from the outer case. Repeat this procedure for the memory card port cover.

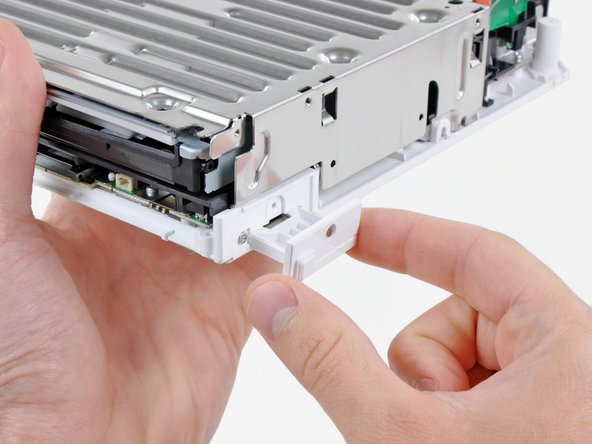
    • Open the controller port cover until information technology is perpendicular to the black controller port bezel.

    • Pull the controller port comprehend straight up to release information technology from the outer example.

    • Echo this process for the memory card port cover.

  8. Remove the two remaining 4.1 mm Phillips screws along the top edge of the black plastic controller port bezel. Lift the bezel from the long edge furthest away from the controller ports and remove it from the Wii.

    • Remove the two remaining four.1 mm Phillips screws along the meridian edge of the black plastic controller port bezel.

    • Elevator the bezel from the long edge furthest abroad from the controller ports and remove it from the Wii.

  9. Remove the two 5 mm Phillips screws above the controller ports.

    • Remove the two five mm Phillips screws above the controller ports.

  10. Use a metal spudger to remove the three highlighted screw covers stuck to the side of the Wii.

    • Use a metallic spudger to remove the three highlighted screw covers stuck to the side of the Wii.

  11. Remove the following screws:

    • Remove the following screws:

    • Two 5 mm Phillips screws

    • I 8.2 mm Tri-Wing screw

  12. Use a metal spudger to remove the two rubber feet stuck to the bottom face of the Wii near the rear ports.

    • Use a metal spudger to remove the two rubber anxiety stuck to the bottom face of the Wii almost the rear ports.

  13. Remove the two 8.2 mm Tri-Wing screws hidden under the feet you just removed.

    • Remove the 2 8.2 mm Tri-Wing screws hidden under the anxiety y'all merely removed.

  14. Lift the outer case straight up off the body of the Wii.

    • Lift the outer case direct up off the body of the Wii.

  15. Remove the small Phillips screw securing the battery door to the bottom panel. This screw is captive to the battery door.

    • Remove the small Phillips screw securing the bombardment door to the bottom console.

    • This screw is convict to the battery door.

    • Pull the battery door out of the Wii.

    • This is a proficient fourth dimension to change the CR2032 battery if it hasn't been inverse recently.

  16. Remove the 8.2 mm Tri-Wing screw that was hidden beneath the battery door.

    • Remove the 8.2 mm Tri-Fly screw that was hidden beneath the battery door.

  17. Remove the two 8.2 mm Tri-Wing screws securing the DVD drive shield near the controller ports.

    • Remove the two 8.2 mm Tri-Wing screws securing the DVD drive shield near the controller ports.

  18. Lift the DVD drive shield upward and remove it from the Wii.

    • Lift the DVD bulldoze shield upwardly and remove it from the Wii.

  19. Remove the four 9 mm #1 Phillips screws securing the DVD drive to the bottom panel.

    • Remove the four 9 mm #one Phillips screws securing the DVD drive to the bottom console.

  20. Lift the side of the DVD drive opposite the controller ports enough to access the cables on its bottom face.

    • Lift the side of the DVD bulldoze opposite the controller ports plenty to admission the cables on its bottom face.

    • Advisedly pull the DVD drive ability cablevision out from under the plastic shroud near the heat sink.

  21. Pull the DVD drive power cable away from its socket on the DVD drive.

    • Pull the DVD drive power cable away from its socket on the DVD drive.

  22. Use your fingernail to flip up the retaining flap on the DVD drive ribbon cable socket. Be sure you are prying up on the retaining flap, not the socket itself.

    • Use your fingernail to flip upwardly the retaining flap on the DVD drive ribbon cable socket.

    • Exist sure you are prying upwards on the retaining flap, not the socket itself.

    • Pull the DVD drive ribbon cable out of its socket.

    • Remove the DVD bulldoze from the Wii.

  23. The following steps are only necessary if your replacement Wii DVD drive does not include the four rubber grommets along the front and rear of the DVD drive housing. Insert the tip of a long, skinny screwdriver into the hole in the center of the first grommet on the rear of the DVD drive housing. Pull the grommet straight away from the DVD drive housing until it is free.

    • The following steps are just necessary if your replacement Wii DVD drive does not include the iv rubber grommets along the front end and rear of the DVD drive housing.

    • Insert the tip of a long, skinny screwdriver into the hole in the center of the commencement grommet on the rear of the DVD drive housing.

    • Pull the grommet straight away from the DVD drive housing until it is gratis.

  24. Repeat the procedure described in the preceding step for the second rubber grommet on the rear of the DVD drive housing.

    • Repeat the procedure described in the preceding step for the second condom grommet on the rear of the DVD drive housing.

  25. Set the DVD drive on its side, with the two rubber grommets along the front of the drive facing you. Insert the end of the skinny screwdriver into the hole in the center of the lower rubber grommet along the front of the DVD drive housing.

    • Prepare the DVD drive on its side, with the 2 rubber grommets forth the front end of the bulldoze facing you lot.

    • Insert the finish of the skinny screwdriver into the hole in the heart of the lower rubber grommet along the front of the DVD drive housing.

    • Pull the screwdriver directly up until the grommet is free.

  26. Rotate the DVD drive housing 180 degrees so that it is resting on the side opposite that of the previous step. Repeat the procedure in the preceding step to remove the second rubber grommet along the front of the DVD drive housing.

    • Rotate the DVD bulldoze housing 180 degrees so that information technology is resting on the side opposite that of the previous pace.

    • Repeat the procedure in the preceding step to remove the second rubber grommet along the front of the DVD drive housing.

Conclusion

To reassemble your device, follow these instructions in reverse lodge.

Embed this guide

Choose a size and copy the code below to embed this guide as a small widget on your site / forum.

Preview

How Much To Repair Wii Broken Disc Drive Nintendo,

Source: https://www.ifixit.com/Guide/Nintendo+Wii+DVD+Drive+Replacement/5164

Posted by: greenequareatunto.blogspot.com

0 Response to "How Much To Repair Wii Broken Disc Drive Nintendo"

Post a Comment

Iklan Atas Artikel

Iklan Tengah Artikel 1

Iklan Tengah Artikel 2

Iklan Bawah Artikel